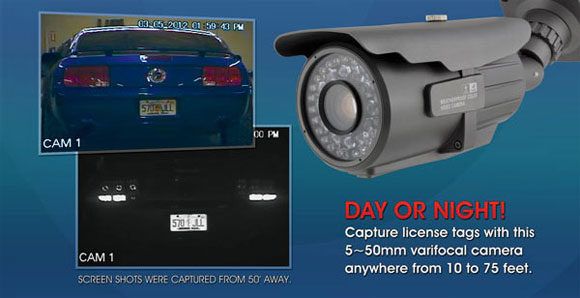
Analog License Plate Cameras
How to set up the DKCIB602VSN camera for License Plate Recognition

When the DKCIB602VSN security camera first comes out of the box, it is set up for normal day time and night time viewing. This is great for “everyday” security camera use but not ideal for license plate recognition (LPR). The instructions below will explain how to set up the camera for LPR. Be aware that setting up the camera for LPR will then make it less useful for ‘normal’ day-to-day surveillance. In general, when covering an area that includes the need for LPR you will have one camera for normal surveillance and a second camera specifically for LPR.
Positioning the License Plate Recognition Camera
LPR cameras are most effective when the vehicles are restricted to pass through a specific spot. For example, a traffic lane through a guard gate. If you have more than one lane of traffic that vehicles go through, you may need a separate LPR camera for each lane. The camera angle cannot be greater than 45 degrees from the license plates. For best results, try to mount the camera to be as straight on with license plate as possible.
Adjusting the Camera Features
Below are instructions about the various camera features and how to adjust them for effective LPR. Its important that you make the initial adjustments at night. Once you have them adjusted to work effectively at night, then you’ll want to review how they perform at dawn and dusk (times of light change), and possibly make further adjustments.
Using the Test Monitor
We all know the experience of standing up on a ladder and having to shout to our helper to give us feedback as we adjust the camera settings. The good news… there’s a much easier way. We highly recommend purchasing a test monitor. The test monitor plugs right into the top of the camera and allows you to see the OSD menu as well as the effect of adjusting the settings right away without having to shout to your helper or getting down off your ladder. The TESTMON12 is a very useful tool you can use with any CCTV camera for adjusting focus and zoom, OSD setup, and troubleshooting.
Nitty, Gritty Set-Up Details
Dip Switches:
Under the sunshield of the camera you will find the On Screen Display (OSD) cap. Inside the OSD cap you will find 3 dip switches. These dip switches control the infrared (IR) illuminators on the front of the camera as follows:
- Dip 1: Large LED’s around the lens, for long-range IR
- Dip 2: Even numbered smaller LEDs, for short-range IR
- Dip 3: Odd numbered smaller LEDs, for short-range IR
Depending on the distance from the camera to the license plate, you may need to turn off the long-range IRs (Dip 1). Especially at night, these high powered long range IRs may be too powerful for shorter range LPR. The short range IR Dips (2 and 3) will probably be left On.
Other OSD Settings
The other settings are accessed through the On Screen Display menu. It’s a good idea to change one setting at a time, save the setting, and then review the result. This way you’ll get a better sense of the effect each setting has on the resulting image (especially at night).
The OSD menu will time out if you idle too long. This will cause you to have to start over again. So be timely about changing and saving the settings. Don’t worry, if you put the camera into a setting that you do not like, you can always factory reset the camera and start again.
| Menu Item |
Correct Setting |
Notes |
| Exposure, DC <Enter> E. Shutter |
1/250(adjust as needed) |
Electronic Shutter. It needs to be a shorter value than for typical applications. You definitely do not want this value to be “Auto”. |
| AGC |
Off (usually) or Low (sometimes) |
Auto Gain Control adjusts the brightness level of the image to keep it at a consistent level. |
| White Balance |
On (no change from default) |
White Balance almost always helps the image so leave this on. |
| Backlight |
D- WDR |
Wide Dynamic Range compensates for different light values in the image. |
| 3D-DNR |
High |
3D Digital Noise Reduction reduces fine static or ‘snow’ in the image |
| Sense-Up |
Off |
Sense-Up if On would cause a digital delay in the image –not good for LPR, so this should be Off. |
| Day & Night, Ext <Enter> Burst ON |
Smart IR On |
Similar to Wide Dynamic Range, this setting will help to balance the white light reflected from the IR. This feature is important for LPR to work… make sure Smart IR is On. |
After all settings are adjusted, if you find that you are having an issue at dusk where the camera is staying in color too long (not switching to infrared mode soon enough), call us. We have a couple tricks up our sleeve that can help in this situation.
Wrapping Things Up
After you’ve adjusted the camera, be sure to tighten the OSD cap (otherwise it can leak!) and re-install the sun shield.
Last Modified: June 27, 2015